SalesTax.com Magento Module Installation and Configuration Guide
Overview
The SalesTax.com Magento module makes processing taxes and reporting them a breeze. The SalesTax.com module will automate and streamline your sales tax processing. You can depend on SalesTax.com by CCH a Wolters Kluver company, starting with an easy installation over real-time data to the most reliable and accurate tax rates, all backed by the largest and most experienced sales tax research team in the industry.
Sign up
Sign up for SalesTax.com the leading sales tax solution:
Sign-Up Form for the Magento Sales Tax Module
Support
Contact us any time with support questions at:
Help for the Magento Sales Tax Module by SalesTax.com
Find the latest information about the SalesTax.com module at:
SalesTax.com
Requirements & Compatibility
- You will need an active account with SalesTax.com
- Your SalesTax.com will need to be setup and provisioned
- Magento Enterprise Versions: * 1.9.0.0, 1.9.1.0, 1.9.2.0, 1.10, 1.11, 1.11.1, 1.12, 1.13, 1.14
- Magento Community Versions: * 1.4, 1.5, 1.6, 1.6.1, 1.6.2, 1.7, 1.8, 1.9
* The module may support older versions of Magento Enterprise, Professional and Community, but has not yet been rigorously tested on every single version.
Obtaining the Module
Option 1: Using Magento Connect
The easiest way is to install the SalesTax.com module from Magento Connect:
https://www.magentocommerce.com/magento-connect/sales-tax-saas-connector-by-wolters-kluwer-trial-version.html
Option 2: Installing through FTP
You can also download the module from:
SalesTax.com
Installation Instructions
Option 1: Using Magento Connect
-
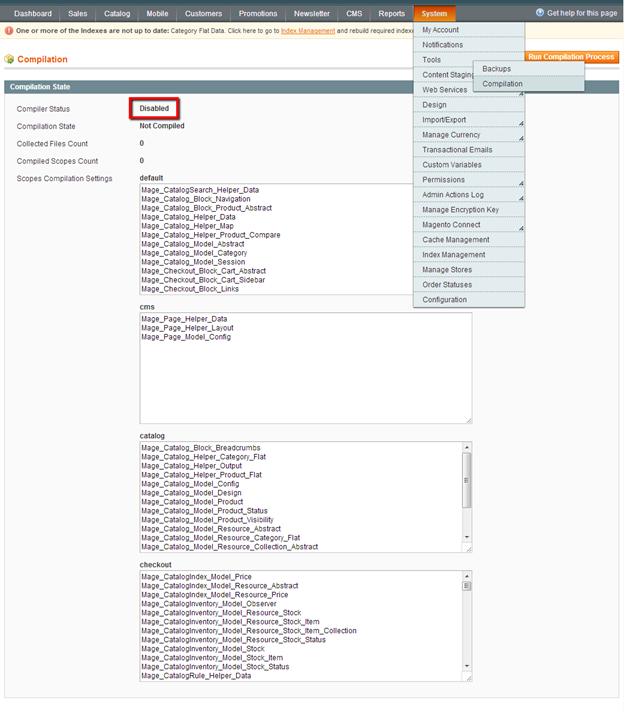
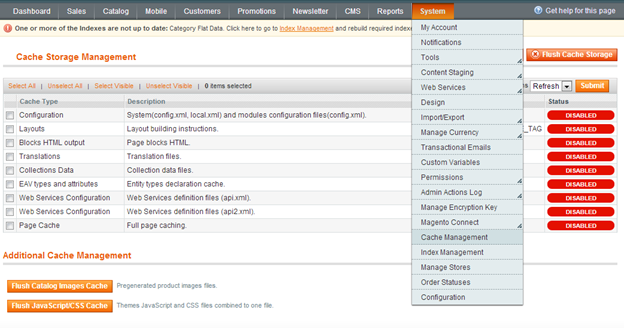
- Disable caching (in the Admin Panel under System > Cache Management) and disable compilation (in the Admin Panel under System > Tools > Compilation)

Figure 1 – Disable Magento Cache
Figure 2 – Disable Magento Compilation
- Disable caching (in the Admin Panel under System > Cache Management) and disable compilation (in the Admin Panel under System > Tools > Compilation)
-
- Log into Magento Connect Manager (in the Magento Admin Panel under System > Magento Connect > Magento Connect Manager). You need to login again and have permission to access this area in the admin panel.
-
- Retrieve the Magento Connect Extension Key.
Visit the SalesTax.com module page on Magento Connect: http://www.magentocommerce.com/magento-connect/salestax-connector-to-salestax-com-by-cch-3098.html and retrieve the extension key (https://www.magentocommerce.com/magento-connect/sales-tax-saas-connector-by-wolters-kluwer-trial-version.html at the time of writing).
Figure 3 – Retrieve Extension Key on Magento Connect
- Retrieve the Magento Connect Extension Key.
-
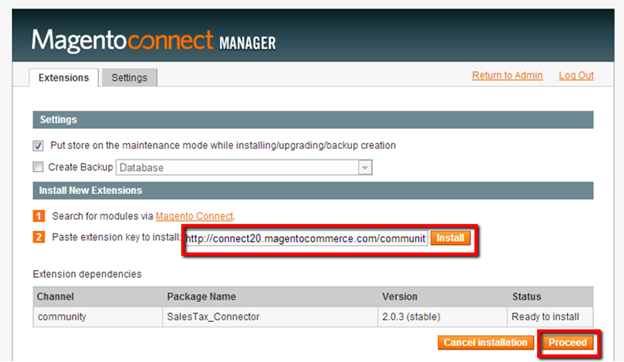
- Running the Magento Connect installation process by entering the extension key, click “Install”, which will load the SalesTax_Connector information. Initiate the installation by clicking “Proceed”, which will start the installation script. Finalize the installation by clicking “Refresh” after the installation script has finished.
Ensure that the script has not encountered any errors.
Figure 4 – Magento Connect Manager Installation View
- Running the Magento Connect installation process by entering the extension key, click “Install”, which will load the SalesTax_Connector information. Initiate the installation by clicking “Proceed”, which will start the installation script. Finalize the installation by clicking “Refresh” after the installation script has finished.
-
- In order to see the module options in the admin panel, you will have to log out and log back in to refresh your permissions.
-
- Re-enable the cache.
Option 2: Installing through FTP
-
- Disable caching (in the Admin Panel under System > Cache Management) and disable compilation (in the Admin Panel under System > Tools > Compilation)

Figure 5 – Disable Magento Cache
Figure 6 – Disable Magento Compilation
- Disable caching (in the Admin Panel under System > Cache Management) and disable compilation (in the Admin Panel under System > Tools > Compilation)
-
- Download the module package from
SalesTax.com
following the steps there.
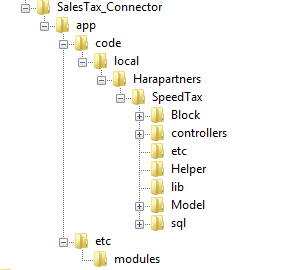
Add all the module files into their respective folders here:
app/code/local
app/etc/modules
Figure 7 – SalesTax.com Magento Module File Structure
The files are already correctly organized and named. Do not rename any of the files as it may affect the proper working of the module.
- Download the module package from
-
- Re-enable the cache.
Configuration
The SalesTax.com module can be configured in the Admin Panel under:
System > Configuration
where you can find the SalesTax.com module tab on the left right under the Magento Tax tab.
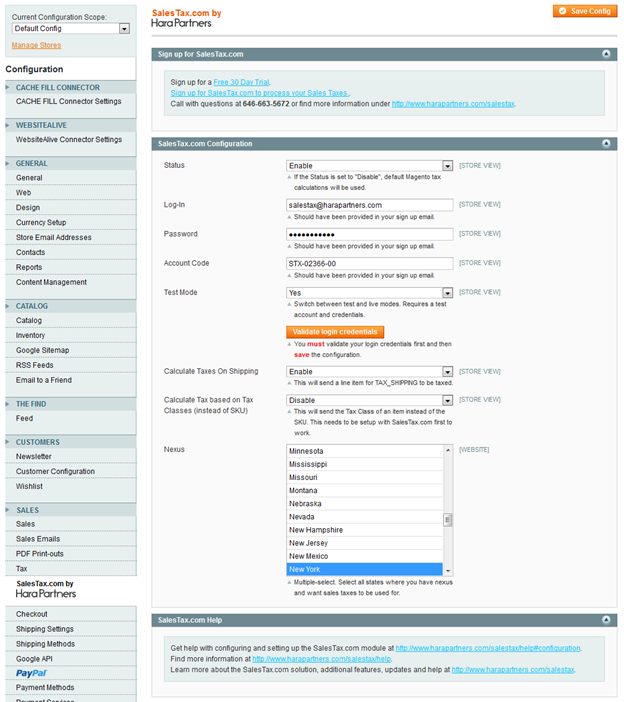
Figure 8 – SalesTax.com Module Configuration
Settings to be filled in are your API credentials (which may be different from your login credentials into:
| Field | Value | Comment |
|---|---|---|
| Status | “Enable” or “Disable” | |
| Log-in | Log-in provided by Wolters Kluver | (contact our sales team for a test account) |
| Password | Password provided by Wolters Kluver | (contact our sales team for a test account) |
| Account Code | Company Code provided by Wolters Kluver | This looks something like STX-00000-00 |
| Test Mode | “Yes” or “No” | NOTE: You will be issued completely different credentials for the Sandbox and Live system |
| Calculate Taxes on Shipping | “Enable” or “Disable” | Setting this value to “Enable” will send a line item with the title TAX_SHIPPING with the shipping value to SalesTax.com |
| Calculate Tax based on Tax Classes (instead of SKU) | “Enable” or “Disable” | You have the option to calculate taxes based on SKUs or Tax Classes. By default taxes are assessed by SKU. If you want to switch to Tax Classes the SalesTax.com SaaS needs to be configured accordingly too. |
| Nexus | List of states and territories | Select the states where you have nexus. Taxes are only computed for shipping states corresponding to this selection |
You may use a test account with the following credentials to test your setup and initial tax report. This account will only work in the Sandbox mode.
| Log-In: | (contact our sales team for a test account) |
| Password: | (contact our sales team for a test account) |
| Account Code: | (contact our sales team for a test account) |
Please make sure to insert your own live credentials before going live.
Setup Tax Classes
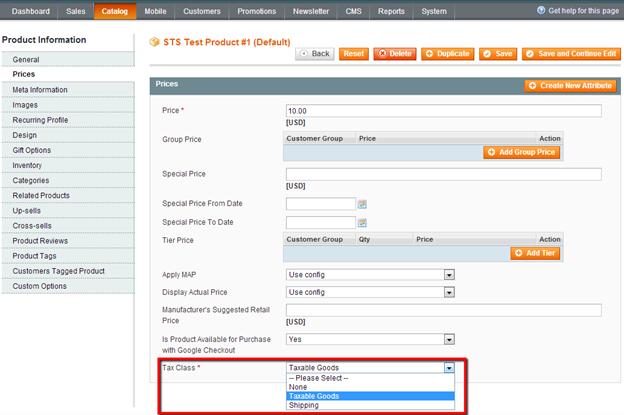
Products must have a tax class assigned other than “None”. “None” means that they are not taxable and SalesTax.com will not assess any taxes. You may choose “default” or “Taxable Goods”, or setup your own tax classes (see below).
You can setup specific Tax Classes in Magento under:
Sales > Tax > Product Tax Classes
Optionally, these Tax Classes can be used with the “Calculate Tax based on Tax Classes (instead of SKU” option in the configuration).
NOTE: Tax Classes need to be communicated and setup with CCH/Wolters Kluver on the SalesTax.com side before they work.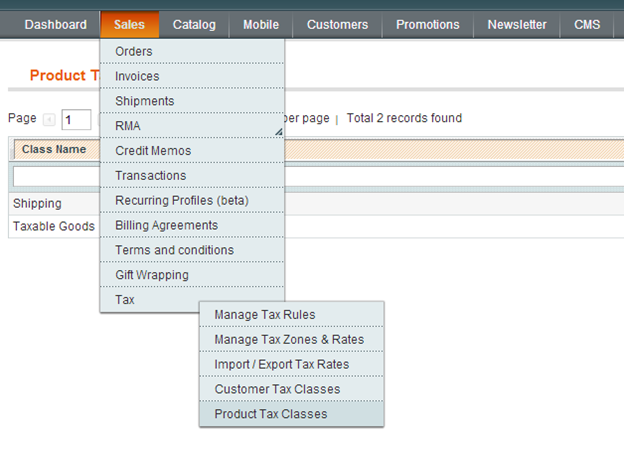
Figure 9 – Magento Product Tax Classes
Product Setup
Products are configured under:
Catalog > Manage Product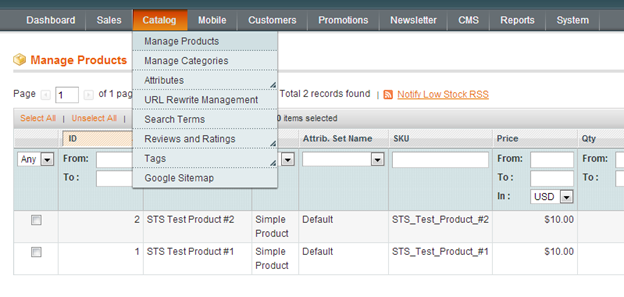
Figure 10 – Magento Catalog Manage Products
Within the product setup the Tax Class is set under the “Prices” option on the left.
NOTE: If no Tax Class is set, i.e. the selection is “None” no tax will be calculated nor recorded.
Learn more about the SalesTax.com Magento module.
Need More Information? |
